Latest Event Updates
How to Install Oracle Instant Client in Windows
 Oracle Instant Client is a collection of free, light-weight, and easy to install Oracle Database tools, libraries and SDKs which can be used for building and connecting applications to an Oracle Database instance. It enables applications to connect to a local or remote Oracle Database, while providing the necessary network connectivity, as well as basic and high end data features. You can get more details from here.
Suppose you need to access data in a Oracle Database from a .Net application. For any software which requires to access a database, it is required to use an API, which connects the application to the database and facilitate the insert, update and delete functions on data.
There are three main types of APIs that can be used to connect to various kind of databases.
- JDBC – API developed by Oracle to access the relational and non-relational database
- ODBC – API developed by Microsoft to access relational databases
- OLEDB – API developed by Microsoft to access both relational and non-relational databases
You can get an idea about relational and non-relational databases from here.
If it is a Java application, you can use the JDBC (Java Database Connectivity) driver. Since, we are looking at a .Net application, we must use either ODBC (Open Database Connectivity) or OLEDB (Object Linking and Embedding Database). As we are dealing with Oracle database, which is a relational database, let’s focus on ODBC.
The .Net Framework data providers can be used to execute commands, and retrieve results. The .NET Framework Data Provider for ODBC can be used for data sources exposed using ODBC. It supports several drivers as;
- SQL Server
- Microsoft ODBC for Oracle
- Microsoft Access Driver (*.mdb)
Since, our target is a Oracle Database, we need below components along with a up and running Oracle database server (local/remote).
- The ODBC Driver for Oracle
- Oracle Client Software
When installing the Oracle Instant Client, we are automatically installing the ODBC driver for Oracle as well. Therefore, below steps would install everything required.
Steps:
- The very first thing you need to do is, find the Oracle database server version. In this case, let’s assume the version is 11g.
- Download the Oracle Instant Client (32 bit/ 64 bit)
- Navigate to Instant Client Downloads for Microsoft Windows. Be specific about the bit size.
- Accept the license agreement
- Download below packages of the selected client version
- Basic Package – All files required to run OCI, OCCI, and JDBC-OCI applications
- ODBC Package – Additional libraries for enabling ODBC applications

- Unzip files from both packages into a single folder (C:\Oracle\instantclient_11_2)
- Configure System Environment Variables
- Copy the folder path of Oracle Instant Client content (C:\Oracle\instantclient_11_2)
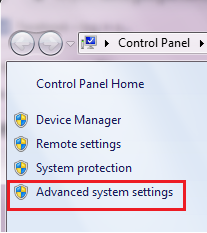
- Right click My Computer icon
- Select Properties

- Click on Advanced system settings
- Click Environment Variables button
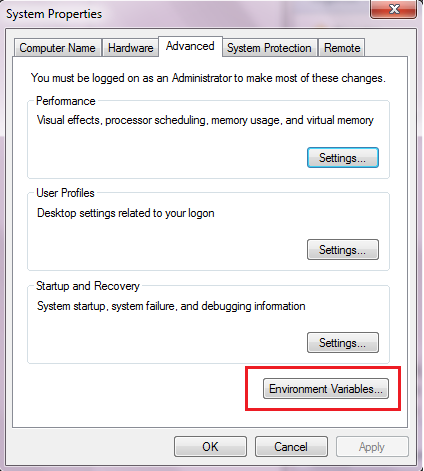
- In the Environment Variables window, configure system variables as follow.
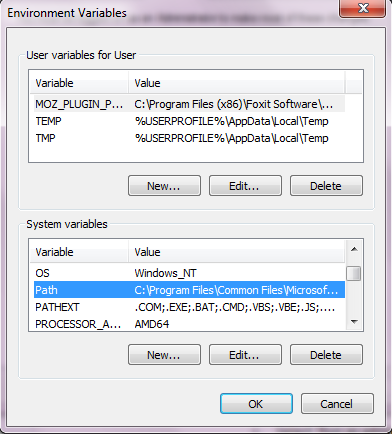
- Append the above folder path to System PATH variable.
- PATH = %PATH%;C:\Oracle\instantclient_11_2 (Under the Edit option, add a ‘;’ and paste the path to the end of the string)
- Create a new System variable named TNS_ADMIN and add the client folder path.
- TNS_ADMIN = C:\Oracle\instantclient_11_2
- Install Oracle Instant Client
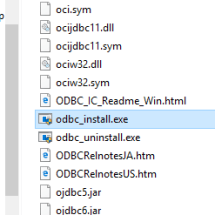
- Open the Oracle Instant Client folder (C:\Oracle\instantclient_11_2)
- Right click odbc_install.exe
- Select ‘Run as administrator’
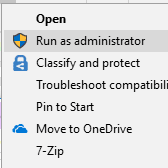
- Provide administrator credentials (you can see a command prompt appear and disappear within few seconds)
Well, this is pretty much about installing the Oracle Instant Client. But, based on your requirement you may have to create a tnsnames.ora file and a DSN (Data Source Name) to test the connection. Therefore, next article will be on ‘Creating a tnsnames.ora file’.
Hope, someone found this useful…:)
RPA (Robotic Process Automation)
Hi all, after a long long time. This time it is nothing technical. Just wanted to share my thoughts and experience about RPA (Robotic Process Automation), the new trend in the industry.
Now, if you are a newbie, who hasn’t heard about Chatbots or automation, specially QA automation, you may be thinking about robots engaged in physical tasks. But, if that’s the case, Robots are not something new, it has been one hot topic for decades. This should be something different. Is this something about AI (Artificial Intelligence) which is so complex and hard to understand? Those were my thoughts, when I first heard the name, RPA. I am sure, you are having same thoughts. But, to be honest RPA is not a very complex as the name sounds. Let’s have some idea about this cool technology.

When we take a manufacturing company (e.g: Car manufacturer, Water bottle producer) there are machines which does almost everything that can be done by a human. Those devices are programmed and mechanically designed to perform physical tasks. Hence those act as physical robots which handles physical operations. The companies can have higher production rate and better profit margins as the automated systems help to minimize error and save time.
The concept of RPA also about automating processes as in above scenario, but with a different target. Instead of targeting physical processes where humans are involved; assembling a vehicle, filling water to bottles, etc. RPA targets logical processes as below.
- Use several data sources and create a daily report and mail to respective personals
- Navigate to a site and register a user online
- Send a reorder request to suppliers, when inventory reorder level is reached, etc.
These are also processes which are done by humans. But, they are performed on software and input/output of these processes are intangible. Of course, you can produce tangible output, if you direct the output (e.g. word document prepared) to a printer queue. Or else, you can connect a physical robot and RPA tool to deal with tangible inputs and outputs. Well, that’s something for you to think later. Let’s try to catch up on RPA.

How to select a RPA candidate..?
Well if you are going to apply RPA to you business, here are few things you need to consider. Selection should be done carefully, as a bad decision may result in a loss.
- One should be able to define a clear business logic to the process in detail manner.
- The selected process involves a boring repetitive task, which takes considerable time and human effort, which can be reduced if automated.
- The process doesn’t involve expertise decision making.
- Expected input, output are not physical (Well you can be creative and make a difference… 🙂 )
- There aren’t any human interventions (e.g. approvals or reviews of authorized personals) in the middle of the process, as this may delay the expected outcomes.
Are there anything important, before we jump into RPA…?
Suppose, you selected a process to automate, but it would be better if you could ask these questions yourself.
- Do we have stable, well functioning applications?
- Is the process selected involves UI mimicking? If so, are there any loading issues on the applications, frequent breakdowns or any issues in our current application UI?
- Can’t we go for API based solutions rather than going for UI mimicking, as it is a software interaction? (Well this would help to speed up the process, as it is going to omit almost all the steps that you are going to do on UI)
- Will there be any changes in the application UI to the future? Will the team change the logic and the layout of the report we are going to generate?
Note: It is not a good idea to pick a process which involves frequent changes, as this may result in a waste of money and effort.
What about good and bad of RPA?
So far, so good.. as long as you are ready to fulfill above criteria, as a company you can save a lot.
- Reduce human error and gain accuracy and effectiveness.
- Speed up processes (computers wouldn’t want to go for lunch or have chit chats as us…;) )
- Cut down cost involved due to a large work force.
- Release of expertise from their boring, repetitive tasks and give them time to concentrate on decision making and direct the company towards success.
But there are few risks as well.
- When the automation is functioning successfully and excess staff, who were engaged in selected processes are removed or assigned to different areas, the company will lack employees who knows in and out of these processes.
- If the tool or technology used to automate the processes is not stable and well designed, there is a high chance of getting everything messed up, rather than having a gain.
Well, that’s pretty much about RPA. Whoa, quite long right. Hope, I could shed some light on what is RPA and why it has become so popular. This is just sharing my ideas about RPA. Any suggestions and comments are always welcome.
Till I come up with something new, have a good time people….:)
How to generate JNI based method Signature?
The term method signature is not new to any of the developers. The moment you hear the term ‘method signature’ you will be thinking about something like follows.
public void print();
When using a general programming language as Java, C++, Python we start writing a method using a method signature, which includes a method name, return type and a parameter list wrapped in round brackets ‘()’.
But when you are working with Javassist, the byte code instrumentation framework, you may want to tell the JVM to access a specific method (CtMethod) of a given Class (CtClass) during the run time. [If you are not familiar with bytecode instrumentation and Javassist please visit here for more information.]
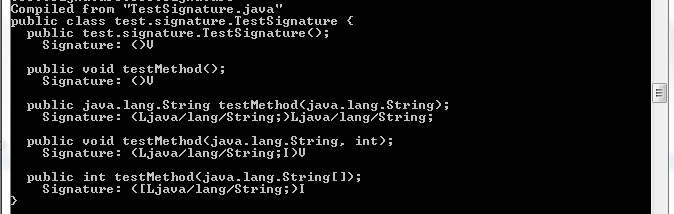
Suppose we have a simple test class, ‘TestSignature’ with three overloaded methods (named as testMethod).
TestSignature.java
package test.signature;

public class TestSignature {
public void testMethod(){
//statements
}

public String testMethod(String x){
//statements
return x;
}

public void testMethod(String x, int y){
//statements
}

public int testMethod(String[] x){
//statements
return x.length;
}
}
A call to getDeclaredMethods() in Javassist API with the method name as ‘testMethod’ will return all the methods with the given name as a CtMethod array. In order to pick the right method you have to go an extra mile by iterating through the array. But, if you know the JNI (Java Native Interface) type signature of the method, you can get the exact method with single call to getMethod() in Javassist API.
The JNI type method signature can be derived by following the naming convention below. The set of special notations used are,
| Type Signature | Java Type |
| Z | Boolean |
| B | byte |
| C | char |
| S | short |
| I | int |
| J | long |
| F | float |
| D | double |
| V | void |
| L | object |
| [ | array |
A method signature derived using these notations is written in the reverse order compared to the normal format. It starts with the list of parameters enclosed in round brackets and ends with the return type [ (parameter_types) return_type ]. It does not contain the method name. Some special points to note are,
- If the parameter/return value is an object, use the fully qualified class name start with ‘L‘ and end with a semicolon (;). E.g: Ljava/lang/String;
- If the parameter/return value is an array, start with a square bracket ‘[‘ which is followed by the above notations or the fully qualified name. E.g: [I or [java/lang/String;
If you follow these instructions you can derive the signature of any given method easily as shown below.
public void testMethod(String name)
    (Ljava/lang/String;)V   // derived signature
But still, there is a chance of making a mistake while trying to convert it to JNI format. Therefore, Java has provided a tool to automatically generate signatures of all the methods in a given class using a single command. The javap tool will make your life lot easier with javap -s command followed by the fully qualified class name.
Steps to be followed to generate the method signatures.
- Write the Java class and save as a java file (TestSignature.java).
- Compile your java file using the command line (javac test.signature.TestSignature) or using the IDE.
- Go to the folder which contains your .class files and run the command javap -s test.signature.TestSignature.
Note:
- If you are going to the exact location of the .class file, use the class name instead of using the fully qualified name)
- You may use the above command if you have only the .class files too. But you should have all the depending classes used by the respective class, in order to generate the signature.
Well, that’s it for the topic. Hope you will find this article useful if you are stuck with a java agent and instrumenting overloaded methods. Till the next article, have a nice time … 🙂
Does the result of an IQ paper really matter?
Hi everyone, this time it is not anything related to technical stuff. I just thought to speak out my mind based on what I experienced. This may be a reason for some to think negative about me (spec…
Does the result of an IQ paper really matter?
Hi everyone, this time it is not anything related to technical stuff. I just thought to speak out my mind based on what I experienced. This may be a reason for some to think negative about me (specially the employers, since I am still a job seeker who is in search for my career), while this may give a different view on the IQ paper for most job applicants, HR departments and whoever read this.
So what is this IQ (Intelligence Quotient) paper? Most of them say, it is used to measure the intelligence of their applicants. Evaluate the problem solving skill of the applicant. The paper consists of bunch of question which take the form as follows.
- Select the
 figure which should come next to complete the sequence
 - Select the figure that doesn’t match
- Identify the number / letter to complete the sequence
- Some practical questions (E.g: Filling 7 ltr jar using 5 ltr and 4 ltr jar at steps)
- Guess the letters that change the meaning of the given words when they are added at front or at end
- Guess the age, time, tallest / shortest one etc.

My question is can you really measure the intelligence of a person based on the marks of the IQ paper? Does the marks really matter even when your applicant has shown knowledge in the field he/she is applying for? Is the score really important when the candidate has shown their capability with what they have provided in their CV? (sometimes they may doubt about the accuracy of the content, or whether those achievements are really based on candidate’s efforts)
So far I have come across three different papers scheduled for one hour as follows.
- Paper 1 : around 20 IQ questions which cover selecting mismatch, pick the next number in sequence, pick the image to complete the square.
- Paper 2 : 20 questions with one mismatch finding question, two or three sequence guessing questions, fill the last row of a matrix with bunch of numbers, connect nine dots with one line, rest with some maths questions and some other questions
- Paper 3 : 60 MCQ questions on picking mismatch, next best, letters to complete sequence and finding next number in sequence
First and third contains general questions a person can figure out when he/she is given the paper for the first time. Specially, if the candidate didn’t practice those questions before hand. Therefore, it may be fair for the person who didn’t practice IQ questions beforehand. But when it come to the second paper, the person who didn’t practice IQ papers, or didn’t know answers for those questions before hand is really going to struggle when answering.
For an example there was this question about a fork on the road, two men standing near it, one is lying and one is only saying the truth. What is the question you should ask from any one of them, if you are given the chance to speak to only one of them? (I don’t think an average person will be able to figure the right question for it if you have only one or two minutes) But what if the candidate has already done this question somewhere and know the answer beforehand?
Then, whoever is going to evaluate the candidates intelligence based on the paper is going to favor the person who knew the answer beforehand. Is it really fair?
Can you really measure the one’s intelligence based on these questions? Does making the question paper really hard with all the maths questions and all other hard questions helps you to pick the right candidate?
My point is to figure out who does employers value most?
- Is it the person who try to solve a problem then and there?
- Is it the person who knew answers to all the questions beforehand?
Because, when you know the answer for a question you just don’t even have to think, sometimes the picture given or one reading of the question is enough for you to recall the exact answer. Then it would take only 20 to 30 minutes for a person who did lot of papers to answer entire paper, while a person who try to solve them for the first time will take whole hour to answer the paper.
The third paper, although it contained 60 questions, I found it more comfortable. Because that is something which anyone can answer without practicing questions. If someone is going to pick the candidate by giving the hardest paper with all the maths and other logical questions as the two paths questions as above, they may be looking for a mathematician or a person with highest memorizing skill.
Therefore, in my opinion if an employer wish to evaluate the problem solving skill or intelligence of a person through an IQ paper it should be prepared while considering follows,
- Making the paper fair for both parties, those who study IQ papers and those who try to solve problems then and there when a problem occurs
- Whether you need a person with best memory or a person with a desire to learn and give their best
- If you want to give the hardest paper with all the maths question, at least give value to their effort by checking the draft paper (not just the answers, because that would help you to know that person did give his/her best to figure out an answer)
- Ambiguity of questions (As it is hard to understand one long statement connected with lot of conjunctions, some questions are hard to figure out unless you are the writer of the question. E.g: time related questions.)
Well, some may see this as criticism of an IQ paper. But if you look at these points as a person who tried to answer those papers without practicing IQ papers, and know your ability to solve problems based on your own ways, I am sure that no one is going to disagree with me. If someone is going to drop a person solely based on their marks for one hard IQ paper which doesn’t follow the normal IQ paper format and being bias with all those age comparisons, height comparisons, time comparisons and other maths questions, they should at least check their candidates’ other values as well.
As a job seeker this may look like criticizing an employer because they didn’t recruit me. Some may laugh and some may this is a stupid thing to do as a job seeker. But I am just speaking out my thoughts. Speaking out, what I would do if I get to evaluate a person based on such paper. Some may not agree with my opinion. Therefore, you are free to share your opinions as well. This is just my view. Hope this didn’t make anyone mad at me….. 🙂
Thank you for reading. Till the next post, bye bye everyone ….. Have a nice time. 🙂
How to copy maven dependencies
Well, today topic is ‘How to copy maven dependencies’. This may not look so important to a regular user, but when you are working on a product which use lot of dependencies and you need to hold it on a version control system, what we are going to talk now is going to be really useful.
But, how?
Suppose you are maintaining a code in a version control system. Your project involves quite lot of dependencies. General approach is including them in the pom file along with their version numbers, artifactId, and groupId. When someone take a pull or clone from your repository and build the project, maven will download all the required dependencies to a default target folder (~/.m2).
But, suppose you need these dependencies included in your classpath as it is required in javaagent. Then what you should do? How are you going to copy them? Are you going to copy all the required dependencies one by one? Should you ask the user to download and copy all of them? That’s not going to be a pleasant experience to whoever is going to use it. Specially if it contain lot of dependencies as it is mentioned earlier.
What if we can make maven to copy all the required jars to a specific folder given by us, while we build the project using mvn clean install? Then it will be just copying that one folder to wherever the location we want or setting the classpath to that folder. That is where the following code segment comes in handy.
<plugin>
  <groupId>org.apache.maven.plugins</groupId>
  <artifactId>maven-dependency-plugin</artifactId>
  <executions>
     <execution>
        <id>copy</id>
        <phase>package</phase>
        <goals>
           <goal>copy-dependencies</goal>
        </goals>
        <configuration>
           <outputDirectory>
           ${project.build.directory}/lib
           </outputDirectory>
           <overWriteReleases>false</overWriteReleases>
           <overWriteSnapshots>false</overWriteSnapshots>
           <overWriteIfNewer>true</overWriteIfNewer>
        </configuration>
      </execution>
    </executions>
</plugin>
The copy-dependencies option of maven-dependency-plugin allows you to copy dependencies listed in the pom to a given folder. Whenever you build the project, it’ll copy dependencies to the given location from the default folder. Therefore, changing version numbers or adding newer dependencies wouldn’t be much of a headache. All you have to do is update the pom to newer values and rebuild the project.
The <outputDirectory> specifies the location where you want to make the folder and copy the dependencies. Above example makes a folder called lib in your project’s ${project.build.directory}, which is ‘target’ folder by . Well given above is just an initial introduction. You can find more details about attributes of maven copy-dependencies from here.
Well, now you know how to make maven to copy all your dependencies to a certain folder while you build the product.
How to generate a MANIFEST & JAR using Maven
Hello everyone, hope you had a pretty good time writing your own javaagent. If you did, then you may have wondered about ways you can do the following stuff.
- Generate agent.jar
- Avoid ClassNotFoundException and NoClassDeffFoundError
If you did, this post will give you some useful tips to achieve above targets. Assuming you have got maven installed let’s look into our solution.
In our case we need to bundle our MANIFEST file and .class files of our agent into agent.jar. There are several ways you can use to generate a JAR which bundles set of files we need.
- Using command line : Executing following command with list of files you need to include, can be used to generate a JAR. You can find more details from here.
- jar cf jar-file input-file(s)
- Using the IDE : Different IDEs provide different steps to generate a JAR. You can find steps to create a JAR in Eclipse from here.
I am pretty sure no one is going to love above methods, because you have to create a jar each time you make a change to your agent. Trying to include each new file you create, to the end of the above command and trying to figure out how to maintain folder structure is going to be really annoying. Use of the IDE will also be a real pain when you get to go through all the above steps after each modification.
But, what if we can easily generate our agent.jar with just a single build command? What if it includes all the .class files you need to include, plus the MANIFEST file under correct folder structure?
Well here is the good news. Including the maven-jar-plugin as follows will do it like magic. Only thing you have to do is including following section under <build><plugins></plugins></build> tags in your pom file.
<plugin>
   <groupId>org.apache.maven.plugins</groupId>
   <artifactId>maven-jar-plugin</artifactId>
   <version>2.4</version>
   <configuration>
      <archive>
         <manifest>
            <addClasspath>true</addClasspath>
            <classpathPrefix>lib/</classpathPrefix>
            <addDefaultImplementationEntries>
                  true</addDefaultImplementationEntries>
            <addDefaultSpecificationEntries>
                  true</addDefaultSpecificationEntries>
         </manifest>
         <manifestEntries>
            <Premain-Class>com.javaagent.SimpleAgent</Premain-Class>
            <Can-Redefine-Classes>false</Can-Redefine-Classes>
            <Can-Retransform-Classes>true</Can-Retransform-Classes>
         </manifestEntries>
       </archive>
   </configuration>
</plugin>
The above plugin addresses two main problems faced by those who work with a javaagent. I have already listed them at the beginning of the post. Let’s have an overall idea about what this plugin does.
Generating Agent.jar
As the name itself says, this plugin is used to create a JAR during the build time of the project. (We are using Maven to build the project) It will create a jar including all the class files in your project. The package structure would be same as it is in your src folder.
Other than creating the JAR, it will include one main thing that is needed by any JAR file. Even for the javaagent we have mentioned it as one of the main files we need. That is none other, but the MANIFEST file.
We have to provide directions on which file to look for, to access the main method of the application. In our case it is the class with the premain method. <Premain-Class> tag provides fully qualified class name of the class with premain method. Likewise <Main-Class> can be used to set the main class as the initiating point of the jar.
<Can-Redefine-Classes> and <Can-Retransform-Classes> allows user to specify some parameters required by the agent. Setting these values are optional, because their default values won’t conflict with our basic javaagent.
Avoid ClassNotFoundException and NoClassDeffFoundError
If you have been trying to instrument methods of JDBC or any other class, where you don’t have the paths of their class files / jars included in the classpath, agent may have aborted after throwing following Exceptions.
- ClassNotFoundException : When an application try to load a class through its String name and no definition for the class with the given name can be found. (Eg: using forname(‘foo.com.TestClass’)
- NoClassDefFoundError : When the JVM or classloader instance try to load definition of a class and definition can no longer be found. It may have found the class definition during compilation time, but fail to find it during run time.
Being unable to find the required class during run time of the agent can be considered as the main reason for both of these situations. This can be solved by including all the required jars to the classpath of the agent. Following tags will do it for you.
- <addClasspath> : add all the names of jars downloaded, as dependencies of the agent.
- <classpathPrefix> : add the given prefix (Eg: lib/) before all jar names included in the MANIFEST. This can be used as the path of each jar during the runtime of the agent.
Once you have set all correct values, you are all set to make a MANIFEST and include it in the JAR during the build time of your agent. ‘mvn clean install’ will do the magic for you. I’m pretty sure you are to love this method if you have been trying above two methods.
See you again from ‘How to copy maven dependencies’. Till then have a nice time…!!
How to write a Simple Agent
After two long introduction chapters, finally we are writing our simple java agent. Main target of our agent is to add an extra print statement to one of the methods in our main class (SimpleMain). In order to do that, we need to create following three files, which are the content of our agent.
- SimpleAgent.class
- SimpleClassFileTransformer.class
- MANIFEST.MF
We can generate these class files once we compile our .java files. But, before we start writing, check whether you have got maven installed with you, because we are going to need it when we generate the manifest file. Otherwise, generating the manifest file going to be a real pain when you start improving your agent. Therefore, better get use to it from the first lesson itself.
So, assuming you have already created a maven project let’s add dependency of Javassist to our pom.xml file. If you don’t include it, you won’t be able to use the methods of Javassist. (hope those experienced viewers won’t get annoyed with these details, because um trying to provide answers to all the questions i came across when i was writing my simple agent) You can obtain the dependency and jar from here based on your preference.
pom.xml
<dependency>
 <groupId>org.javassist</groupId>
 <artifactId>javassist</artifactId>
 <version>3.20.0-GA</version>
</dependency>
SimpleClassFileTransformer.java
Next, lets write our SimpleClassFileTransformer class. This is where we include all the operations we need to do during the instrumentation process.
package com.testProject.javaagent;

import javassist.*;

import java.io.ByteArrayInputStream;
import java.lang.instrument.ClassFileTransformer;
import java.lang.instrument.IllegalClassFormatException;
import java.security.ProtectionDomain;

public class SimpleClassFileTransformer implements
ClassFileTransformer {
 public byte[] transform(ClassLoader loader,
 String className, Class classBeingRedefined,
 ProtectionDomain protectionDomain, byte[] classfileBuffer)
 throws IllegalClassFormatException {

   byte[] byteCode = classfileBuffer;
   if(className.equals("com/testMain/SimpleMain")){
      ClassPool classPool = ClassPool.getDefault();
      try {
         CtClass ctClass = classPool.makeClass(
                new ByteArrayInputStream(classfileBuffer));
         CtMethod[] methods = ctClass.getDeclaredMethods();
         for (CtMethod method : methods) {
            if (method.getName().equals("print")) {
                System.out.println("Instrumenting method : " + method.getName());
                method.insertAt(1,
                  "System.out.println(\"This is the injected line\");");
            }
         }
         byteCode = ctClass.toBytecode();
         ctClass.detach();
       } catch (Throwable e) {
            e.printStackTrace();
       }
   }
 return byteCode;
 }
}
This class implements the ClassFileTransformer interface and override the transform method which can read and write class files as byte arrays. Parameters available in this method can be used in different situations based on our requirement. ClassfileBuffer contains the content of the currently instrumenting class as a byte array. When this method is called, it will obtain the current byte array and return a byte array including all the modifications done using the byte code instrumentation library. In this example, we try to obtain the class which match the fully qualified class name of our main class (com/testMain/SimpleMain) and instrument the print(). insertAt method of javassist allows us to insert our print statement to the specified line of the method. (Let’s explore other main methods of javassist later) Once the instrumentation is complete, it will recompile and verify whether insertions are according to the standards and load the classes to JVM.
SimpleAgent.java
This is where we create a transformer object and instruct to attach instruction to class (using addTransformer()). As it is mentioned earlier, invocation method of the agent is decided based on the main method used. In our example, we will be using the premain method which pass instrumentation object and other agent parameters and invoke agent before classes are load to VM.
package com.testProject.javaagent;

import java.lang.instrument.Instrumentation;

public class SimpleAgent {

 public static void premain(String agentArgs,
                   Instrumentation instrumentation){

 System.out.println("Starting Agent");
 SimpleClassFileTransformer transformer =
                  new SimpleClassFileTransformer();
 instrumentation.addTransformer(transformer);
 }
}
MANIFEST.MF
As it is mentioned in previous post, there are few attributes that need to include in the manifest file. But, for our simple agent, we will need a simple manifest file as follows. (I’ll post the code segment needed for the generation of manifest as a separate post). Class path is provided assuming all the jars needed by the agent are included in the ‘lib’ folder
Manifest-Version: 1.0
Premain-Class: org.wso2.javaagent.JDBCAgent
Class-Path: lib/javassist-3.20-GA.jar
These are the main files of our agent. Next step would be bundling of the .class files into our Agent.jar. This can also be automated using small piece of code added to our pom file. You can generate the jar using the command line as well. But i won’t go into detail about it, because it was bit annoying. But if you dig around a bit you would be able to figure it out. But, if you can wait a little, I am sure you’ll be happy with the automated way. Anyhow, assuming we have bundled our files into our Agent.jar let’s write the main class. Because, we need a main class to instrument with our agent.
SimpleMain.java
package com.testMain;

public class SimpleMain {
 public static void main(String[] args){
 SimpleMain sm = new SimpleMain();
 System.out.println("Simple Main");
 sm.print();
 }

 public void print(){
 System.out.println("Print method of Simple Main class");
 }
}
That’s it, we have everything to test our agent. Let’s run our agent using the command line. First compile the SimpleMain class. Then run the following command after going to the location of the SimpleMain.class.
> java -javaagent:path/to/agent/Agent.jar com.testMain.SimpleMain
There is a special keyword of java called as ‘-javaagent’ which is used to pass our java agent as a parameter to JVM. Value given after jar is the fully qualified name of our main class. You can also provide the class path of the main class using ‘-cp’ attribute of java.
> java -cp path/to/main -javaagent:path/to/agent/Agent.jar com.testMain.SimpleMain
Once we run our agent using above command our output will be as follows,
Starting Agent
Instrumenting method : print
Simple Main
This is the injected line
Print method of Simple Main class
Well, now you know how to write a simple java agent. Adding more features can be done modifying the the transform method. Next post will be on ‘How to generate a MANIFEST using Maven’. Future, ill get back with another simple example which uses more features of javassist.
Hope, you guys enjoy writing your first agent. Have a nice time…!!!
Requirements of a Javaagent
Second post is to introduce main parts of a java agent. Before we jump in an write a java agent, lets see what are the main files needed by an java agent. First of all, you should notice that all the files required by the agent need to be bundled up in a JAR file. There are many ways to prepare our agent.jar. But let’s keep the bundling part aside, till we finish writing a simple agent, and move to files needed.

Unlike normal program with just a main class and bunch of other classes, agent require three main files as described below.
SimpleAgent.class
This is the class file which contain our agent. It’ll include a premain method or agentmain method according to the requirement of the writer. There may be either one method type or both in a single class file. But the selection of method used to invoke the agent will be decided based on the time user want to invoke the agent. As it is mentioned in earlier post,
- premain() – invoke agent before VM start
- agentmain() – invoke agent after VM is staterd
This class will be used to pass the instrumentation object along with any parameters needed by the agent and add a transformer to classes which we need to instrument.
SimpleClassFileTransformer.class
This is where provide the instructions on all the operations we need to do on our classes. This class is written by implementing the ‘ClassFileTransformer’ interface. The transform method will carryout redefinition / re-transformation of classes as specified by the user. But the layout of the instruction given here would depend based on the bytecode instrumentation framework used. As mentioned earlier, we’ll be using Javassist through out the tutorial.
MANIFEST.MF
Other most important file is the manifest file, which provide all the parameters needed to initialize the agent. This is a special type of file, which provide information on files packaged in a JAR. (For those who has worked with jars this may not be a stranger. But for me, it was totally new thing, because it was the first time i wrote one) When we create a jar, it will add a default manifest file, with set of default values as follows including environment details as follows.
Manifest-Version: 1.0
Created-By: 1.7.0_06 (Oracle Corporation)
But, in a java agent, we need to include few more attributes as given below. Except for those mentioned as optional, we will not be able to start the agent, because it will throw some kind of an error and abort the agent.
- Premain-class – Used when agent is invoked at JVM launch time. It need to include the fully qualified name of the agent class. In our case also, we’ll be defining this attribute, because we are working with premain method. This will provide an entry point to our agent by specifying where to look for Agent.class which need to be invoked before the main.class
- Agent-class – Used when we are invoking the agent after VM has started. This is used when we are using agentmain method in our Agent.class.
- Can-redefine-class – (optional) Specify as true or false, where default value is false. If it is not specified as true, it won’t allow to carryout re-transformation of classes.
- Can-redefine-class – (optional) Specify as true or false. Won’t allow to redefine classes during the instrumentation process, if it is not specified as true.
- Class-Path – We need to add paths of all the jars needed by the agent during run time. (Eg; javassist-xyz.jar) Importing all the relevant jars while working on the IDE will make us think everything is fine. But those files will not be available during run time. Hence it will abort the agent throwing ‘ClassNotFoundException’ and ‘NoClassDefFoundError’.
Therefore, we need to make sure that we add all these parameters and necessary files to our agent before we start our agent. At first i started to manually write this manifest files, which turned out to be a real pain when the number of libraries used in the program increased. Later, figured out the easiest way to generate the manifest file during project build time. (I’ll provide the simple modification on the pom file, needed when building with Maven in a future post)
Apart from above three main files, it may include class files of any other Java classes needed by the agent as well. (For an example, if you want to have a set of methods which you want to call from the instrumented class methods, it would be less complex if you add them in a separate class and call those methods, than adding them in the SimpleClassFileTransformer.)
Well, this is the end of Requirements of a Java Agent. Let’s start writing our simple agent in our next lesson, ‘How to write a simple Agent’. (Don’t forget to install Maven and set up your IDE to make the next step easy…) See you all in next lesson.
Getting to know javaagents
Java agent is a powerful tool introduced with Java 5. It has been highly useful in profiling activities where developers and application users can monitor tasks carried out within servers and applications. The ability to inject code segments by modifying classes and their method bodies during the run time has become useful in many ways. Intercepting parameter values passed between methods, calculation of execution time of methods can be considered as some examples. As long as you know the class name and the structure of class along with their method bodies, injecting a piece of code would take less than a minute.
Since this is going to be a series of instruction for beginners in java agents, I would start with a brief introduction on powerful java agents. Hence, this post will cover basic points as, the concept behind agents and how they work.
Well, the true power of these java agents lie on their ability to do the bytecode instrumentation. Now, you may wonder what is this bytecode. Although we humans can understand the program files written using programming languages known to us (java, python, php), computer processors do not understand them. Processors have their own language, with set of terms known as opcodes. They represent the instruction needed to carryout operations. Collection of these opcodes, instructions are referred to as bytecode, which is included in .class files we obtain after compiling our .java files. Instrumentation is the process of modifying these bytecode.
But, why do we need this java agent feature? If this is the first time you are reading about java agents, you surely may have this question.
Well, the answer is, although we get those .java files when we write our own code, files we receive with jars or any type of application we download or install would contain only .class files. We cannot read them using IDEs we use for development. The only way to access and modify their content is using libraries that work close with bytecode. Given below are three most famous libraries used in bytecode instrumentation.
- ASM – low level library. Need to have better understanding about bytcode instructions
- Javassist – middle level library. Operates on top of ASM. Knowledge about bytecode is not a must.
- AspectJ – high level framework. Much more easy to work with.
Out of these three libraries, Javassist will be the library used in the future examples. But, before we start writing a simple agent, let’s get an overall idea on how an agent works.
Mainly, there are two ways that an agent can be invoked. Type of the agent is decided based on the main method type selected by the developer.
- premain() – Agent is loaded before main class and other respective classes are loaded onto memory. This premain method, as its name described, will be invoked before the main method.
- agentmain() – Using this method, we can invoke an agent at an arbitrary point in time, after all the classes are load onto JVM.
Since we are new to the process, let’s start with the simple premain() method. JVM will be informed about our agent by passing the path to our agent jar as a parameter. It can be done by including the -javaagent parameter in the command line.

The above figure describes the basic concept of this instrumentation process. Once we provide the details of the class we want to modify along with method names and content we need to inject, agent will obtain the bytecode of the respective class before it load onto JVM. It will make a copy of those byte code as a byte array and do requested changes on the instruction set by pushing and popping instruction on the stack. Finally, once the instrumentation is completed, it’ll recompile the new bytecode to verify whether there are any compilation errors. If it cause no compilation errors, it will load the new bytecode to the JVM, which can then be used in the tasks it was assigned to do.
So, above is a brief introduction to java agents. This long description without any example may have make you sleepy. But, don’t worry, next few articles would raise your enthusiasm in agents.
Next topic would be on ‘Requirements of a Java Agent’. Have a great time.
